1편에서는 Polling/Long Polling/WebSocket/SSE 등 실시간 기법들을 살펴보았고, 알림이라는 요구사항에는 SSE가 잘 맞는다는 결론에 도달했다. 이번 편에서는 Spring Boot에서 SSE 알림을 구독(연결 유지)하고, 서버 이벤트를 알림으로 푸시하는 기본 구현을 정리한려고 한다. 다음 행위들을 통해 알림 기능을 구현한다.
- 구독(Subscribe): 클라이언트가 /subscribe로 연결을 열면 서버는 emitter를 등록하고 연결을 유지한다.
- 전송(Send): 서버에서 알림이 발생하면 해당 사용자 emitter로 이벤트를 푸시한다.
- 정리(Clean-up): 연결이 끊기면 registry에서 emitter를 제거한다.
- Heartbeat(Ping): 일정 주기로 ping을 보내 연결 유지를 돕고, 끊긴 emitter를 빨리 정리한다.
1. 구독(Subscribe): /subscribe로 연결 열고 connected 이벤트까지 보내기
SSE는 “한 번 연결을 열고 응답을 끝내지 않은 채 이벤트를 계속 흘려보내는 방식”이다. 그래서 구독 API는 (1) 스트림을 여는 것과 (2) emitter를 등록하는 것, 그리고 (3) 연결 확인 이벤트를 1회 보내는 것까지가 한 세트로 동작한다.
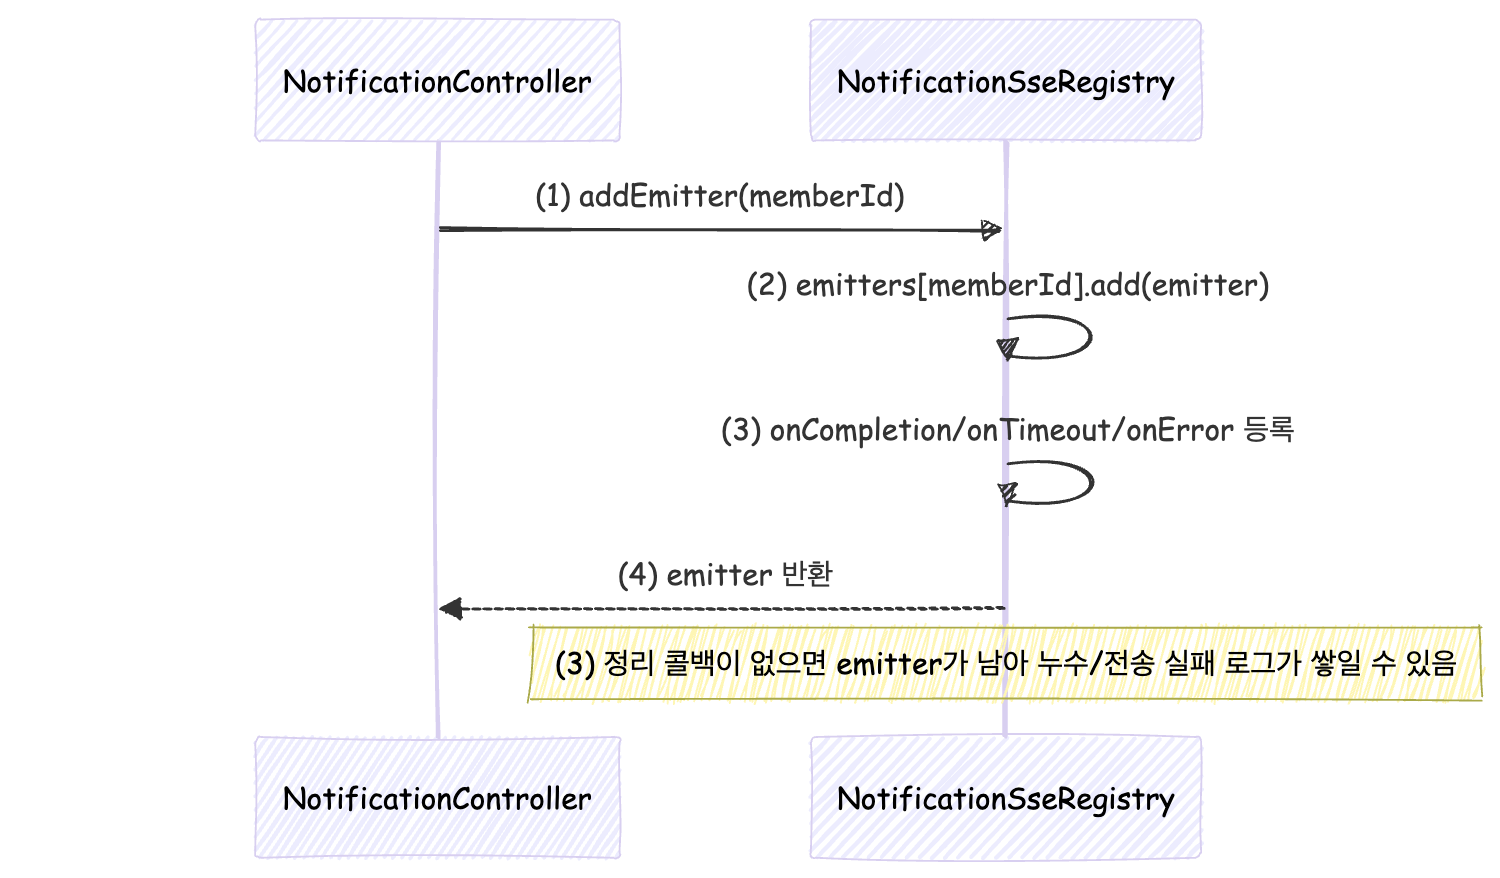
시퀀스 다이어그램

- 클라이언트가 구독 API를 호출한다.
- 서버는 사용자(memberId) 기준으로 SseEmitter를 만들고 Registry에 등록한다.
- 등록된 SseEmitter를 컨트롤러로 돌려준다.
- 컨트롤러가 emitter를 반환하면 응답은 text/event-stream으로 열리고 연결이 유지된다.
- 연결 직후 connected 이벤트를 1번 보내서, 프론트가 “연결이 실제로 열렸음”을 즉시 확인한다.
구현된 코드
@RestController
@RequestMapping("/v1/notifications")
@RequiredArgsConstructor
public class NotificationController {

    private final NotificationUseCase notificationUseCase;

    @GetMapping(value = "/subscribe", produces = MediaType.TEXT_EVENT_STREAM_VALUE) // (4)
    public SseEmitter subscribe(@AuthenticationPrincipal AuthDetails authDetails) {
        Long memberId = authDetails.getMemberId();

        // (2)(3) emitter를 registry에 등록하고 반환받는다
        SseEmitter emitter = notificationUseCase.subscribe(memberId);

        // (5) 연결 확인 이벤트(디버깅/UX에 도움)
        try {
            emitter.send(SseEmitter.event()
                    .name("connected")
                    .data("ok", MediaType.TEXT_PLAIN));
        } catch (IOException ex) {
            emitter.completeWithError(ex);
        }

        // (4) emitter 반환과 함께 스트림 연결이 열린 상태로 유지된다
        return emitter;
    }
}
여기서 핵심 포인트
- produces = TEXT_EVENT_STREAM_VALUE가 SSE의 시작점이다.
- connected 이벤트는 기능 필수는 아니지만, 프론트 디버깅/연결 확인에 도움이 된다.
2. Registry: emitter 등록 구조와 “끊긴 연결 정리”가 핵심
SSE는 장기 연결이기 때문에, 결국 안정성은 “정리(clean-up)”에서 갈린다. 브라우저 탭 종료/네트워크 단절/프록시 idle timeout 등으로 연결이 끊기면, 서버는 emitter를 지워야 한다.
전송 시퀀스
- DEFAULT_TIMEOUT=0L로 emitter를 만들어 “서버가 임의로 끊지 않는” 기본값을 둔다.
- memberId -> List<SseEmitter>에 넣는다(여러 탭/디바이스 허용).
- 끊기는 모든 케이스에서 removeEmitter로 빠지도록 콜백을 등록한다(누수/실패 로그 방지).
구현된 코드
@Component
public class NotificationSseRegistry implements NotificationPort {

    private static final long DEFAULT_TIMEOUT = 0L;
    private final Map<Long, List<SseEmitter>> emitters = new ConcurrentHashMap<>();

    public SseEmitter addEmitter(Long memberId) {
        SseEmitter emitter = new SseEmitter(DEFAULT_TIMEOUT); // (1)

        emitters.computeIfAbsent(memberId, ignored -> new CopyOnWriteArrayList<>())
                .add(emitter); // (2)

        emitter.onCompletion(() -> removeEmitter(memberId, emitter)); // (3)
        emitter.onTimeout(() -> removeEmitter(memberId, emitter));    // (3)
        emitter.onError(ignored -> removeEmitter(memberId, emitter)); // (3)

        return emitter;
    }

    @Override
    public SseEmitter subscribe(Long memberId) {
        return addEmitter(memberId);
    }
}
3. 전송(Send): 알림 이벤트를 emitter로 push하기
알림 전송은 결국 “이 사용자로 열려 있는 emitter들”에 대해 같은 이벤트를 흘려보내는 일이다. 중요한 포인트는 전송 실패(IOException)를 ‘끊긴 연결’로 보고 즉시 정리하는 것이다.
전송 시퀀스

- 서버 이벤트가 발생하면 send(memberId, payload)가 호출된다.
- 구독 중이 아니라면 조용히 스킵한다.
- emitter마다 notification 이벤트를 JSON으로 내려준다.
- IOException이면 끊긴 연결이므로 emitter를 제거한다.
구현된 코드
@Override
public void send(Long memberId, NotificationPayload payload) { // (1)
    List<SseEmitter> memberEmitters = emitters.get(memberId);

    if (memberEmitters == null || memberEmitters.isEmpty()) {  // (2)
        return;
    }

    for (SseEmitter emitter : memberEmitters) {
        try {
            emitter.send(SseEmitter.event()                     // (3)
                    .name("notification")
                    .data(payload, MediaType.APPLICATION_JSON));
        } catch (IOException ex) {
            removeEmitter(memberId, emitter);                  // (4)
        }
    }
}- 서버 이벤트가 발생하면 send(memberId, payload)가 호출된다.
- 구독 중이 아니라면 조용히 스킵한다.
- emitter마다 notification 이벤트를 JSON으로 내려준다.
- IOException이면 끊긴 연결이므로 emitter를 제거한다.
4. Heartbeat(Ping): 연결 유지 + 끊긴 emitter 빠른 정리
SSE는 연결을 오래 유지한다. 그런데 운영 환경에서는 종종 이런 일이 생긴다.
- 로드밸런서/프록시가 idle connection을 끊어버림
- 클라이언트가 조용히 죽었는데 서버는 emitter를 계속 들고 있음
- 연결은 살아있다고 생각했는데 이벤트가 늦게 전달되는 느낌(버퍼링 체감)
그래서 일정 주기로 ping 이벤트를 보내는 heartbeat를 추가했다.
Heartbeat 시퀀스

- 스케줄러가 일정 주기로 sendHeartbeat()를 호출한다.
- 모든 emitter에 ping 이벤트를 보낸다(데이터는 간단히 ok).
- ping에서 IOException이 나면 끊긴 연결로 보고 제거한다.
구현된 코드: @Scheduled로 ping 이벤트 보내기
@Scheduled(fixedDelayString = "${notification.sse.heartbeat-ms:30000}") // (1)
public void sendHeartbeat() {
    for (Map.Entry<Long, List<SseEmitter>> entry : emitters.entrySet()) {
        Long memberId = entry.getKey();
        List<SseEmitter> memberEmitters = entry.getValue();

        if (memberEmitters == null || memberEmitters.isEmpty()) {
            emitters.remove(memberId);
            continue;
        }

        for (SseEmitter emitter : memberEmitters) {
            try {
                emitter.send(SseEmitter.event()                 // (2)
                        .name("ping")
                        .data("ok", MediaType.TEXT_PLAIN));
            } catch (IOException ex) {
                removeEmitter(memberId, emitter);              // (3)
            }
        }
    }
}
그리고 이 스케줄이 동작하려면 애플리케이션에 스케줄링이 활성화돼 있어야 한다.
@EnableScheduling
@SpringBootApplication
public class ConikApplication { }
5. 프론트 수신: EventSource로 connected / notification / ping 처리하기
서버는 이미 세 가지 이벤트를 보낸다.
- connected: 구독 직후 1회 (연결 확인)
- notification: 알림 payload(JSON)
- ping: heartbeat (연결 유지/정리 도움)
프론트는 EventSource로 스트림을 열고, 이벤트 이름별로 핸들러를 붙이면 된다.

- 브라우저에서 /subscribe로 SSE 연결을 연다.
- 서버가 연결 직후 connected를 1회 보내고, 프론트는 연결 성공을 확인할 수 있다.
- 서버가 주기적으로 ping을 보내면, 프론트는 필요하면 로그/상태 표시에만 사용한다.
- 실제 알림은 notification 이벤트로 오며, JSON을 파싱해서 UI를 갱신한다.
구현된 코드
// 예: 쿠키 기반 인증이면 그대로 동작 (EventSource는 기본적으로 쿠키를 함께 보냄)
const es = new EventSource("/v1/notifications/subscribe");

es.addEventListener("connected", (e) => {
  console.log("[SSE] connected:", e.data); // "ok"
});

es.addEventListener("ping", (e) => {
  // heartbeat는 대개 UI에 굳이 노출하지 않고,
  // 필요하면 연결 상태 디버깅/모니터링 용도로만 사용
  // console.log("[SSE] ping:", e.data);
});

es.addEventListener("notification", (e) => {
  // 서버에서 payload를 JSON으로 내려주므로 파싱
  const payload = JSON.parse(e.data);

  console.log("[SSE] notification:", payload);

  // 예시: UI 갱신 포인트
  // 1) 토스트
  // showToast(payload.title, payload.message);
  // 2) 배지 증가
  // incrementBadgeCount();
  // 3) 알림 리스트 갱신
  // notificationsStore.add(payload);
});

// EventSource는 error 발생 시 브라우저가 자동 재연결을 시도한다.
es.onerror = (err) => {
  console.warn("[SSE] error (auto-reconnect will happen)", err);
};

// 페이지 이동/탭 닫힐 때 정리
window.addEventListener("beforeunload", () => es.close());
주의 사항
브라우저 기본 EventSource는 표준 API 특성상 Authorization: Bearer ... 같은 커스텀 헤더를 직접 붙일 수 없다. 따라서 Spring Security에서 SSE 구독 엔드포인트가 Authorization 헤더 기반(JWT) 인증을 필수로 요구한다면, new EventSource("/v1/notifications/subscribe") 방식은 401로 막힐 수 있다. 우리 팀은 인증 체계를 바꾸지 않고 Bearer 정책을 그대로 유지하기 위해, fetch 스트리밍 방식으로 SSE를 수신하면서 Authorization 헤더를 첨부하는 방안을 선택했다.
6. 여기까지 구현의 결론(짧게)
여기까지의 구현을 한 문장으로 요약하면 이렇다. /subscribe로 들어온 연결을 SseEmitter로 등록하고, 알림은 notification 이벤트로 푸시하며, 끊긴 연결은 콜백/IOException으로 정리하고, heartbeat(ping)로 끊김과 정리를 보강한다.
7. 다음 편 예고(3편)
여기까지는 “단일 서버에서 잘 동작하는 SSE”다. 다음 편에서는 운영으로 갔을 때 바로 고민하게 되는 이슈들을 다룰 예정이다.
- 다중 WAS에서 registry가 서버 메모리에만 존재할 때 생기는 문제
- 동시 연결 수가 늘어날 때 스레드/FD/메모리 관점에서 어떤 병목이 생기는지
- 프록시 버퍼링/타임아웃, Open-In-View, 커넥션 점유 같은 이슈를 어떻게 바라볼지
- 그리고 실제로 어떤 방식으로 해결할지